Shimano Dura Ace 7900 Read Derailler Adjustment
Reports of the demise of this Web site are greatly exaggerated! Nosotros at sheldonbrown.com thank Harris Cyclery for its support over the years. Harris Cyclery has closed, but nosotros keep going. Keep visiting the site for new and updated articles, and news about possible new affilations.

If y'all are interested in advert on this site delight go to SheldonBrown Ads.
-
- Front
- Front end maintenance
- Indexing
- Rear
- Rear Maintenance
-
- Autoshifting
- B-tension
- Alternating Cable Routing
- Cables
- Cable Replacement
- Chain Length
- Chain Line
- Trimming
- Skipping
- Stiff Links
![]()
How Derailers Work
Most modern bicycles employ derailer (or dérailleur, if you prefer the French spelling) gearing systems. Gear shifting is accomplished past leading the concatenation from one sprocket to some other.
Derailers look complicated, just they are actually very uncomplicated, brute-force devices.
The front end derailer simply consists of a cage fabricated of sheet metal that can movement back and forth from side to side. As it does, information technology pushes the chain sideways until it tin't run on the chainwheel it has been riding on, then the chain falls off and lands on the chainwheel closest to its new location.
The rear derailer looks more complicated, but the only additional complication is that the rear derailer as well contains the arm with the leap-loaded pulleys, that takes up the slack as the chain goes to smaller sprockets.
Both derailers piece of work by pushing the chain sideways, so that it runs at an angle onto the sprocket, instead of direct. When the angle becomes precipitous enough, the chain tin no longer mesh with the sprocket. It then falls off of the sprocket and lands on the side by side one in line.
When the chain is being shifted from a smaller sprocket to a larger 1, it is slightly different. The chain is forced to rub against the side of the larger sprocket next to the one it is riding on. Somewhen, it gets snagged on the sides of the teeth of the larger sprocket, and yanked up and away.
Upwardly through the 1970s, chains had protruding rivet pins that snagged on the sides of the teeth. These chains fit the 3.5mm space between the sprockets of 5-and half dozen-speed freewheels. Newer sprockets usually have peculiarly shaped teeth, and ramps on their sides to make shifting smoother without the protruding rivet pins. This is the major reason that modern derailer gear systems work better than older ones. Information technology has very little to practise with the quality of the derailer.
Rear Derailer Aligning
Earlier You lot Try To Arrange A Rear Derailer, Brand Sure It Isn't Bent!
Earlier you endeavor to adjust your rear derailer, yous should really make sure it isn't bent. The rear derailer is the virtually fragile and exposed function of a bicycle, and they are ever getting bonked.
When a rear derailer gets whacked, information technology bends inward, toward the spokes. In some cases, it will really go into the spokes of the rear wheel while it is turning. This is very bad news when it happens. If you are lucky, the derailer breaks. If you are less lucky, information technology takes a few spokes with information technology, and tin can hands ruin your rear bicycle. If you lot are truly unfortunate, the pull of the spokes on the derailer can tug it backwards so forcefully that the dropout (the frame part that the rear axle and derailer adhere to) volition exist bent very sharply astern, or even broken. In some cases, this can return a frame a full loss.
When the derailer gets biffed, it is not usually the derailer itself that bends, only rather the hanger, the tab of the frame dropout that the derailer attaches to. This is because the part of the derailer that usually gets bumped is the strongest part, the parallelogram linkage that moves the cage back and forth. (Note; on many older or less expensive bicycles, the hanger is not part of the frame, but is a 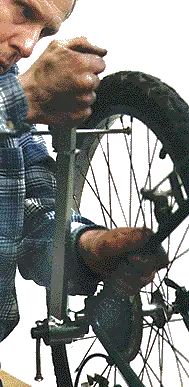 separate part, which comes with the derailer. This "adaptor claw" is held on mainly by the rear axle nut, or the quick-release skewer. On many newer frames, information technology is a commodities-on function, so information technology can be replaced if aptitude.)
You lot can roughly check alignment past center, if you await at the derailer from the rear. The two pulleys should be lined up exactly underneath 1 another, so that the chain runs straight up from the tension caster to the jockey pulley, with no sideways camber. Compare the line of the pulleys with that of the sprockets above them.
Well-intentioned folks sometimes catch ahold of the derailer and attempt to pull it back outward to its proper position. Unfortunately, they usually wind upwards yanking on the derailer by its caster muzzle, which is the weakest part. As a result, they neglect to straighten the bent hanger, and, instead, curve the cage likewise.
When a derailer hanger is bent, it is generally necessary to remove the derailer to straighten information technology. Wheel shops have a special tool, a bar with a sliding gauge on information technology, that screws into the hole in the hanger in place of the derailer. This tool provides lots of leverage to straighten the hanger with, and has a gauge to judge when information technology is parallel to the rear wheel. A rough, on-road repair is sometimes possible by removing the derailer and bending the tab with an adjustable wrench.
Note, broad-range Campagnolo derailers have cages that are non intended to be vertical; the lower pulley is further outboard than the jockey pulley.
![]()
![]()
The Four Rear Derailer Adjustments, In Order of Importance
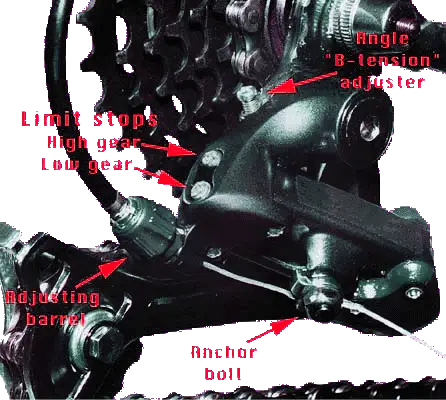
The limit-stop screws
The limit stops are two screws that fix the limits of how far the derailer can motion from left to right. They are usually located on the back of the parallelogram; sometimes they face outward to the bicycle's correct. The ends of a spiral bumps into an internal part of the parallelogram when the derailer has moved all the way in the direction controlled by that screw.
The limit screws are not intended to move the derailer; they tell information technology where to terminate when it is moved past the shifter control. Loosening a limit cease allows the derailer to be moved farther in a particular management past the shifter. Tightening it restricts the motion of the derailer in that management.
Normally, the limit stops need to be set when a new derailer is installed, and should not require any further attention. If they seem to need adjustment on a wheel that used to work properly, it is normally an indication that the derailer is bent. Trying to right a bent derailer with the adjusting screws is OK as a temporary field repair, just is not a right long-term repair.
On newer derailers, the limit stop screws are labeled: "H" (loftier) and "L" (low). On some older derailers, in that location is no such label, because the working ends of the screws are visible. If you shift such a derailer into high gear, annotation which screw is bumping into an internal function of the derailer...that screw is the loftier-gear stop; the other is the low-gear stop.
These are not specially fussy adjustments. Don't exist afraid to give half a plow or a turn at a fourth dimension. The just place where there's whatsoever danger is the rear derailer's low gear end, which tin can allow the derailer or the chain to go into the spokes if information technology is ready very loose. The other limit cease spiral of the rear derailer (and the two on the front derailer) volition crusade overshifting if gear up as well loose, but this is relatively harmless and easily corrected.
-
Depression-gear limit stop.
The low gear limit terminate (usually marked past the alphabetic character "L") stops the derailer from shifting past the largest sprocket and throwing the chain into the spokes. If it is too loose, the derailer tin can overshift into the spokes, with disastrous results. If it is besides tight, it volition be difficult or impossible to shift down to the largest rear sprocket. -
High-gear limit stop
The high gear limit end (usually marked past the letter "H") stops the derailer from shifting past the smallest sprocket and wedging the chain between the smallest sprocket and the dropout. If information technology is too loose, it really doesn't brand much difference on a wheel with indexed shifting, because the cablevision will non allow the derailer overshift past the smallest sprocket. If the screw is also tight, it will be difficult or impossible to shift up to the smallest rear sprocket.Difficulty in upshifting to the smallest rear sprocket is rarely acquired by misadjustment of the high-gear limit screw. More oft, it results from the derailer's being bent, or from backlog friction in the cable.
-
Indexing aligning
The indexing aligning is the about frequently needed derailer adjustment. The detents (click stops) that provide indexing are in the shifters, and the alphabetize adjustment sets the length of the cable so that the derailer is in the right place to correspond with each click terminate.If a derailer is correctly adapted when it is installed, this is the only aligning that should have to be tweaked afterwards on, to suit cable stretch, or when cables are replaced.
The indexing adjustment is an adjusting barrel located at one end of a length of cablevision housing. Many rear derailers have more than than 1 alphabetize adjuster. All indexed derailers have an adjuster where the concluding loop of cablevision housing ends at the derailer itself. Many bicycles also have another adjusting butt located so that it can be adapted while you are riding. On mountain-bicycle-type shifters, this will be located at the shifter itself, only where the cable exits. On road bikes with handlebar-mounted shifters, there will usually be an adjusting barrel at the cable stop where the upper length of housing ends on the upper end of the down tube.
It doesn't thing which of these adjustments y'all utilize: utilise whichever is more convenient.
Earlier you try adjusting the indexing, shift to the highest gear (smallest sprocket.) Make sure that the shifter is in the position that allows the cable to exist every bit loose every bit it tin can get. (Exception: Shimano Rapid Rise derailers piece of work the opposite fashion, then you are shifting to the largest sprocket).
Click the shifter to the starting time click after the fully loose position, so plow the pedals forwards. The chain should shift to the second smallest sprocket. If it doesn't, it means the cablevision is as well loose. Turn an adjusting barrel counter-clockwise to tighten the cable. Kickoff with one-half a turn, and then bank check again. It is very common for beginners to over-correct by turning the adjuster too far. Sometimes this volition result in moving the indexing and so far off that information technology sort-of works, except that the clicks are one notch off, so one of the extreme gears doesn't piece of work properly, but the others appear to be OK. This is why it is of import to check that the shift from the smallest to the second-smallest sprocket occurs in the correct place on the shifter.
Fine adjustments are accomplished co-ordinate to the following principles (reverse for Shimano Rapid rise derailers)::
-
Shifting to larger sprockets is accomplished past tightening the cable;
if such shifts are dull, the cable is not tight enough--
plough the barrel counterclockwise to tighten it. -
Shifting to smaller sprockets is accomplished by loosening the cablevision;
if such shifts are too slow, the cable is not loose enough--
turn the butt clockwise to loosen it.
-
-
Bending aligning ("B-tension")
Modern derailers have two spring-loaded pivots. The lower pivot, sometimes called the "a pivot" winds the cage upwardly to take upwardly slack every bit you lot become to smaller sprockets. The upper "b pivot" adds additional slack take-upwardly ability past pushing the derailer'due south parallelogram backwards.The tension of the two springs needs to be balanced for best shifting.
Most derailers accept an angle aligning screw (Shimano calls information technology "B-tension adjustment"). This adjusts the tension of the upper ("b") spring of the parallelogram, and thus the peak of the jockey pulley. The looser this screw is, the closer the jockey pulley will exist to the cluster.
The angle adjustment will need to be set according to the size of the largest rear sprocket. If y'all change to a cluster with a larger or smaller low-gear sprocket, you volition need to re-adapt this setting. You will as well need to adjust this if you change the length of your chain.
If the angle adjuster is set too loose, the jockey pulley will crash-land into the largest sprocket when the bicycle is in the lowest gear (large rear, small forepart). This is the gear you should check the adjustment in. A larger low-gear sprocket may require a unlike rear derailer, for enough angle aligning to clear the sprocket. In extreme cases, such as with a Shimano 36-tooth sprocket, a longer angle-adjustment spiral may be needed -- some people even install the screw backwards.
Since a derailer shift is caused by forcing the chain to run at an angle, the greater the angle, the sooner it volition shift. The closer the jockey caster is to the cluster, the sharper the angle will be for a given amount of sideways motion of the derailer. Thus, the looser the angle adjuster screw is, the ameliorate the shifting will be.
Campagnolo Rear Derailers
2001 and later Campagnolo rear derailers don't use a "b tension" adjustment. Instead, they have an "a tension" adjustment. Spring balancing is done with this adjustment, only in the opposite management. That is, loosening the "a tension" has the aforementioned upshot as tightening the "b tension."
![]()
![]()
Chain Length
If you supercede your chain or sprockets, you lot should check your chain length. New bondage come up longer than they demand to be for the vast majority of bicycles. You volition almost certainly need to shorten a new chain before installing information technology on your bike. If your large sprocket sizes are anywhere near the maximum your rear derailer can handle, the concatenation length can exist quite disquisitional.
If the chain is too short, it will be at risk for jamming and mayhap ruining the rear derailer if you accidentally shift into the large-large combination. Never run with a chain that is besides short, except in an emergency.
If the chain is likewise long, it will hang slack in the small-scale-small combinations. You should never employ those combinations anyway, then this is non a serious problem. If you exceed the recommended gear range for a particular rear derailer, y'all may have to accept droop in these gears.
Y'all may need to add together links on recumbent bicycle, or a touring wheel with a large cluster. Only combine new chains of the same brand and model. You could ask the cycle shop for surplus links from another chain. These probably would only take been discarded anyhow.
The all-time technique for setting chain length is to thread the chain onto the large/big combination, without running it through the rear derailer. Mesh the two ends on to the large chainwheel so that one complete link (one inch, -- one inner and 1 outer half-link) overlaps. In nearly all cases, this will give the optimum length.
Inner and Outer half-links must alternate:
 Full-link overlap, correct with chain on the large chain- bicycle and sprocket but non yet run through the rear derailer. | 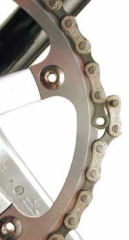 Overlaps by a half link. Already likewise short unless it could overlap by a total link as at left. | 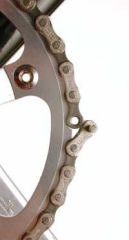 Will connect, only too short except on a bicycle with a non-derailer drivetrain. |
|---|
Start with the shortest chain that would permit connectedness, assuasive 1 extra complete link as shown in the photo at the left above, and then the bottom of the chain droops if you lot align it equally in the moving picture at the right. And then, with the rear derailer in the outermost position, thread the chain through the rear derailer and connect it. Turning the crank past manus, check that the chain will shift to the large-large combination using the front derailer or rear derailer, or both at once, without binding.
Note: SRAM 1X systems require two actress complete links. Run into the SRAM transmission.
To shorten or lengthen a chain, you lot need to use a chain tool to press out a link pin. Not all chain tools work with all bondage, so make sure yous take the right one.
When possible, piece of work by shortening the chain, rather than lengthening information technology. Making the concatenation too short, then lengthening it is a time-waster. Preferably, join the chain using a main link, and so the chain can easily be removed for cleaning. The narrowest chains, used with cassettes that accept 10 or more sprockets -- sometimes 9 -- must exist joined using special one-time-use replacement pins or chief links. Yous probably get only i of these with a new chain, so information technology is important to go the length right on the first endeavour.
![]()
Alex Ramon has a video that shows:
How To Summate Concatenation Length
![]()
Concatenation Condition
Chain condition will have an issue on how well your system shifts; in particular, if you chain is dry out and rusty, it will not shift well, because the links will be potent.
Chains wear out, typically after only a few thousand miles. As they wearable, they elongate slightly. They should be checked regularly for signs of this sort of wear. This result is addressed in particular in my article on Chain Vesture and Maintenance.
A worn chain will usually not be the cause of shifting problems, merely usually is the cause of skipping under load.
Strong links
If you have a regular, repeating skip or hitch every iii or 4 turns of the pedals, you may take a stiff chain link. This is commonly the link where the concatenation was joined when it was installed. When the chain tool presses the pin through the chain, the head of the pin tends to pull the uppermost concatenation plate along with information technology, so that the 2 outer plates are squeezing together confronting the inner plates.
The easiest mode to fix this is to bend the problem area of the chain into a "Z" shape, with the bad articulation on the diagonal part, so flex the chain dorsum and forth from side to side. This will slightly spread the tight plates, and free upwards the link.
A link that has been aptitude in a concatenation-jamming incident can cause like symptoms. Generally, the aptitude link (or the whole chain) will need to exist replaced. But see our article about on-road repairs: the chain can sometimes be unbent, good enough to get abode or to the side by side bicycle shop..
The easiest mode to spot stiff/damaged links is to shift the bike into the small/small gear (the gear you should never actually ride in.) This gear has the chain at its slackest, and flexes information technology further than whatever other gear, as it goes around the pocket-size rear sprocket and the derailer pulleys. Slowly backpedal while watching the concatenation as it feeds through the rear derailer, and yous will normally be able to encounter the bad link leap.
Rear Derailer Maintenance
The rear derailer's moving parts are best kept clean and lubricated. A thorough cleaning is easier if the derailer has been removed from the bike. Lubrication and pulley replacement are possible without removing information technology.
- With the derailer in place, attempt to wiggle the chain cage inward and outward. Excess play makes for sloppy shifting; the remedy is to replace the derailer.
- Derailer pulleys turn the fastest of any part of a bike. If the plain bearings of near pulleys are not kept lubricated, and go dry out, they squeal loudly ["like being chased by a pack of angry mice" -- Sheldon]. Pulleys should exist replaced if bearings or teeth are worn. Pulleys with plain bearings (most) or loose ball bearings should be disassembled, the bearings relubricated with light grease, and reassembled every few grand miles.
- After cleaning, the pivots of the parallelogram assembly can be lubricated with a few drops of oil.
- The chain-cage pin generally is fairly well sealed, but if you are ambitious, you could disassemble and regrease this pivot. This task tin can be tricky, every bit yous must position all the parts correctly before tensioning the spring. Re-tensioning is easier with the derailer installed on a bicycle.
- You may cannibalize derailers, for case replacing worn pulleys with good ones from a aptitude derailer, or installing a concatenation cage of a different length from another derailer of the same series. Many derailers can be adjusted to a unlike width of chain by replacing the pulleys and the bolts which hold them.
![]()
![]()
Front Derailer Adjustment
There are different front derailers for different seat-tube angles, different-sized chainwheels, two or 3 chainwheels, and in some cases, different shifters. Run across my article on front end derailers for details.
The front derailer should not exist adjusted unless the rear derailer is already working properly, because front derailer adjustments are affected by the position of the rear derailer, and yous will demand to access all of the rear sprockets to adjust the front derailer correctly.
Front derailer adjustment is not an exact science. Information technology requires a good eye and a flake of patience to get right.
When you utilize ability to the pedals, the ability is transmitted to the rear sprockets by the upper run of the chain. The lower run of the chain is simply the return path, and the just tension on the lower run is applied past the jump in the rear derailer. Since the front derailer does its shifting with the upper, power-transmitting, section of concatenation, it has a harder job. In general, you should non await a front derailer to shift well while you are pedaling hard, even if the rear derailer does.
Front Derailer Adjustments
-
Chain slope and derailer selection
On a bicycle with a pocket-sized rear wheel, loftier bottom bracket or steep seat tube, the chain cage of the front derailer needs to sit further to the rear. Instructions for many clamp-on front derailers specify a range of angles. The front derailer of some bicycles attaches to a special slotted tab, which may be brazed, bolted or glued onto the frame. The tab limits the range of chainwheel sizes that tin can be used, simply information technology can be aligned ideally for the detail bicycle. Another solution is a Shimano E-type front end derailer, which attaches to the bottom bracket, and so it can be rotated to whatever needed angle --though it tin be used just with the particular chainwheel sizes for which it is designed.
-
Clamp Position
The most disquisitional adjustment of a front derailer is its attachment to the cycle frame. This must be set correctly earlier you endeavour to adjust the limit stops. All derailers except the E-type derailer allow two adjustments, for angle (every bit seen from to a higher place) and height.
-
Angle
of the front derailer is judged by looking downward on the cage from above. Modern front derailers have very subtly shaped cages, so it is not always easy to tell when the platonic adjustment has been made. In general, the centerline of the cage should be parallel to the centerline of the frame. Rotating the derailer and then that the dorsum of the muzzle is farther out will sometimes improve shifting to the small ring of a triple by preventing overshifting, merely may crusade increased need for trimming on the larger rings. It may likewise crusade the crank to strike the cage.Rotating the derailer so that the back of the cage is further in volition assist reduce the need for trimming on the large chainwheel, and will provide crisper downshifting, only with a greater tendency to overshift on the inside. This may be appropriate on bicycles equipped with an anti-derailment device.
-
Acme
of the front derailer is a principal factor in how well it volition shift. Manufacturers commonly recommend 2 mm clearance between the bottom of the outer cage plate and the teeth of the big chainwheel. This is a bit of an oversimplification. All-time performance will event from the very everyman position that withal but barely keeps the muzzle from hit the chainwheel teeth. The lower you can get it, the meliorate it volition shift, and the less you will need to trim the front end derailer.
-
-
Derailer/Chainwheel Mismatch
To get the front derailer as low as possible, the curvature of the outer cage plate has to match the curvature of the largest chainwheel.
If y'all utilize a larger chainring than the derailer was designed for, the rear of the cage will hitting the teeth of the big chainring before the front end of the cage gets low enough to provide crisp shifting without the demand for trimming.
If you apply a smaller chainring than the derailer was designed for, it will shift OK, but you'll have to do a fair amount of trimming, due to the rear of the cage being college than it should be, so that the chain crosses through it further back.
Lately I've started modifying front derailers for improved shifting with larger rings. I take a Shimano RSX front derailer on a wheel with fifty/38/28 Biopace (the sweep of a 50 Biopace is comparable to that of a 52 circular.) The RSX front derailer works great on its intended 46/36/26 setup, simply the muzzle doesn't friction match the bend of the larger chainring. In a couple of minutes with a grinding wheel, I removed a good bit of metal from the bottom rear of the outer cage plate, and a bit from the bridge section where the inner and outer muzzle plates connect at the back. This made the derailer match the curvature of the larger chainwheel, and allowed me to set up it low enough to provide good chain control. This setup now works fine with an STI indexed shifter that doesn't permit "trimming" the front derailer.
-
Depression-gear limit stop.
The depression-gear limit stop stops the derailer from shifting past the smallest chainwheel and throwing the chain onto the bottom bracket shell. If the stop is also loose, the concatenation volition fall off when you try to downshift to the small chainwheel. If likewise tight, yous will find it difficult or impossible to shift down to the small chainwheel.On older forepart derailers, the low-gear terminate is the one closer to the frame. Many newer designs reverse this position for reasons relating to the mechanism used.
The basic adjustment for the low-gear stop is to set it and then that the chain just barely clears the inner plate of the cage when the lowest gear (small front, large rear) is selected. This will usually exist the best position for double-chainwheel setups, and will let the utilize of most or all of the rear sprockets with a minimum of trimming.
For triple chainwheels, it will sometimes be necessary to adjust the low-gear stop a chip looser, so that the outer plate of the derailer can travel far enough to knock the chain off of the heart band.
Anti-derailment devices
 In some instances, y'all may observe that one adjustment of the low-gear terminate causes the chain to derail past the modest chainring, but a tighter setting results in slow downshifting to the small ring.
 In such cases, a proficient, if inelegant, solution is sometimes to install an anti-derailment device that clamps to the seat tube. These products, such as the 3rd Eye Chain Watcher ® and the N-Gear Jump Stop ® fix a barrier preventing the concatenation from overshooting the small-scale band, no matter how loose the low-gear cease is set up. This allows the low-gear cease to be set to allow the derailer to move farther inboard for faster, more precise shifting, fifty-fifty under some load. These devices can often save the twenty-four hour period when extra-wide range gearing is used on a mountain bike or tandem.
-
High-gear limit finish
The high-gear limit stop is pretty straightforward. It should be set and then that the chain almost rubs on the outside plate of the forepart derailer muzzle when the cycle is in its highest gear (big front/small rear). This will reduce the need for trimming equally yous shift the rear derailer.If the shift to the large chainwheel is slow, make sure that you aren't pedaling too hard: front upshifting requires existence ready to accept the cranks slow downwardly when the shift takes place. If the shift is unreliable even when you lot are pedaling lightly, you may exist able to better it by loosening the loftier-gear finish a bit. If you practice then, check to make sure that the derailer cage is not moving so far out that it can exist struck by the crank every bit information technology goes by.
Sometimes front upshifting may be improved past rebending the front border of the inner muzzle plate outward a bit. This may be washed with an adjustable wrench. This is rarely necessary on modern front derailers, only used to be a very mutual play tricks on older, cruder designs.
![]()
![]()
Front end Derailer Trimming
As yous shift the rear derailer i style or another, the management from which the chain runs from back to front changes a bit. As a upshot, sometimes information technology is necessary to "trim" the adjustment of the forepart shifter after changing gears with the rear, even if you are staying on the same front chainring. Trimming means using the shifter to movement the front end derailer cage sideways but a piddling flake, enough to stop the concatenation from rubbing, simply non enough to make information technology shift to a different chainring.
Older front end derailers designed for friction shifters used to crave trimming as a matter of grade, just newer indexed systems can often be fix upward so that no trimming is necessary.
For a "trimless" front indexing, you volition commonly need to be using the item chainwheel sizes for which the front derailer was designed, and the chainwheels must non be bent even a little bit. The lower downwardly the cage is mounted, the less trimming will exist needed.
[The SunTour Symmetric shifter -- from around 1982, non-indexed -- was designed to trim the front derailer when the rear derailer was shifted. Discover how the front shift lever moves forrard and astern as the rear shift lever is rotated on the video clip beneath. Remarkably, this feature has not become standard on newer systems, though it could be implemented with a unproblematic lever device somewhere along the cables. Information technology is offered on the very expensive Shimano electronic shifting system. I give thanks N. Keith Duncan for this video prune. -- John Allen]
If your system requires trimming, information technology is essential that you do information technology. If you lot ride with the chain rubbing confronting the front derailer cage, you will wear a groove in the side of the muzzle and it volition never shift properly.
Front Derailer Maintenance
The front derailer, similar a rear derailer, is all-time kept clean and lubricated. Cleaning is reasonably easy with it in place on the bicycle. If removed for servicing, it must be realigned when it is reinstalled;
- The forepart derailer is directly in the path of dust thrown off the tires. Total fenders do a lot to go on a forepart derailer working well, especially under messy conditions
- Cheque for bending and vesture to the chain cage
- Bank check alignment, as already described, for good shifting and to avoid wear to the chain muzzle.
- After cleaning, the pivots tin can be lubricated with a few drops of oil. Don't overdo it.
- The cablevision bends back and forth where information technology attaches to many front end derailers. Check that the cable has not frayed. In case it fails unexpectedly, comport a spare. It should be long enough to reach the rear derailer. If you don't have a tool to cut an over-long cablevision, you can coil information technology upwards.
Run across too my Forepart Derailer Choice Article
Chainline
"Chainline" refers to the sideways distance of the chain/sprockets from the centerline of the bike.
Front shifting problems are frequently related to incorrect chainline, that is, the chainrings are either as well shut in, or, more commonly, likewise far away from the bike's centerline.
This generally is the result of having the wrong lesser bracket for the detail crankset model in employ.
This site has a separate major article on Chainline
![]()
![]()
Cables
By and large, shifting bug are due non to whatsoever trouble with the derailers, but to excessive friction in the cables that command them. The usual result of cable friction is to brand the derailer move sluggishly when the return spring is pulling information technology toward a smaller sprocket.
You must take a ferrule at each cease of each piece of housing. This helps keep the hole in the housing aligned with the cable end, and also keeps the housing from falling apart.
With modern, lined housing, greasing the cables is no longer necessary. In fact, information technology makes things worse, due to the stickiness of the grease. A bit of medium oil on the section of cablevision that runs through the rear loop to the rear derailer volition assistance retard rust, though.
Cables and housing come in a wide range of quality. I recommend buying only premium-grade cable and housing.
For problem installations, super-premium cables such as Gore Tex ® will aid. There are also some situations where the spring tension of the rear derailer is just insufficient to overcome the cable friction. SRAM (Grip Shift ®) used to make a product called a "Bassworm ®" which seals the rear housing loop and supplies spring assistance to the cable at this point.
A Problem Solvers Travel Agent, using simply the larger pulley, can substitute for 90 degrees of cable bend, and reduce friction.
I have another major article on cables at this site, covering these issues in more than detail.
Cable Replacement
Alternate Cable Routings
Alternate cable routings for Shimano derailers arrange them for use with nonstandard shifters or cassettes. There is detailed information near mixing and matching derailers, shifters and cassettes in our article about drivetrain mixing.
Cable Attachment (front)
Some newer front derailers are designed with a choice of 2 cable attachment options. If the cablevision is run on the outside of the anchor bolt, away from the parallelogram pivots, the cage moves less far for a given cable movement, providing a lighter activity, and easier fine trimming.
If the cablevision is run on the inside of the ballast bolt, toward the parallelogram pivots, the muzzle moves farther for a given cable movement. This is often necessary to provide right functioning with indexed shifters.
Skipping/Autoshifting
Do your pedals sometimes jump forward when you lot pedal actress hard? This is a common complaint, especially when a rider stands up to pedal. Indeed, this dangerous condition is 1 very good reason for remaining in the saddle and spinning in your lower gears, rather than standing up and pumping in a higher gear.
Although jumping/skipping/autoshifting is ofttimes blamed on the derailer, it is only very rarely the result of a derailer malfunction.
This jumping may be one of 2 totally unrelated problems: skipping or autoshifting. The first footstep in troubleshooting this trouble is to determine whether the trouble is simple skipping or autoshifting.
- Skipping involves the chain jumping over the tops of the sprocket teeth under load. Later the chain jumps, it remains on the same sprocket. This is usually caused by wearable to the concatenation and/or the sprockets, and is most probable to happen on the smaller rear sprockets, particularly if they are used in conjunction with the small chainwheel in forepart. This issue is addressed in considerable detail in my article on Chain Clothing.
A form of skipping, not necessarily under load, sometimes also results from stiff links.
- Autoshifting feels simply like skipping, except that after the spring yous detect that the rear derailer has shifted upwardly to the next smaller sprocket. Autoshifting is commonly caused by a combination of frame flex and cable friction. The mechanism of this is explained in detail in a carve up article on Autoshifting.
Summary
Every bit you lot can see, there is a lot to exist done to get the most out of your derailers. Buying a more expensive derailer is ordinarily not the solution to shifting issues. The bodily performance of your system will depend much more on how well the system is set up and adjusted.
There has been more than comeback in front end derailers than in rears. If you have an older front end derailer, and it is not giving satisfactory performance, you may do good from a replacement. Beware, all the same, because older front derailers were designed to work with a wide range of chainwheel sizes, while new models are optimized for particular ratios, and may not work well with your crankset.
![]()
Britain's Cyclists' Touring Club Website has a proficient article on derailer gearing.
![]()
Thanks to Andrew M. Torres for his kind assistance.
![]()
Would you like to read what I wrote about derailers twenty years agone?
Encounter: A Boom From The Past
![]()
BicycleTutor.com has a video that covers some of this material.
See also the Park Tool Website.
![]()
- What'due south New
- Sheldon Brown on Facebook
- Site Feedback & Questions
Articles by Sheldon Chocolate-brown and Others
- What's New
- Beginners
- Bicycle Glossary
- Brakes
- Commuting
- Cyclecomputers
- Do-It-Yourself
- Essays and Fiction
- Family Cycling
- Fixed-Gear
- Frames
- Gears and Drivetrains
- Humour
- Old Bikes
- Repair Tips
- Singlespeed
- Tandems
- Touring
- Video
- Wheels
- Translations
- Sheldon - the homo
Reports of the demise of this Web site are profoundly exaggerated! We at sheldonbrown.com thank Harris Cyclery for its support over the years. Harris Cyclery has closed, simply we proceed going. Continue visiting the site for new and updated articles, and news about possible new affilations.
Copyright © 1997, 2007 Sheldon Brown
Harris Cyclery Home Page
If you lot would similar to make a link or bookmark to this folio, the URL is:
https://www.sheldonbrown.com/derailer-aligning.html
Last Updated: by John Allen
Source: https://www.sheldonbrown.com/derailer-adjustment.html
Post a Comment for "Shimano Dura Ace 7900 Read Derailler Adjustment"